CONTACT US
How to Stand Up an AWS Serverless API Configuration using Lambda and the Serverless Framework
AWS Serverless API – API Configuration Requirements
The AWS serverless API is a fast, inexpensive and highly flexible way to create API endpoints. When combined with the power of the AWS serverless function it drives flexibility, economy of resources, efficiency and precision in using loosely coupled, highly focused AWS lambda functions.
Initial Setup Steps
- Npm needs to be installed (see here on how to do that if you don’t already have it).
- Download your AWS Secret and Key (see here).
Configure the CLI
Install the Serverless framework CLI.
npm install -g serverless
Then configure Serverless with your AWS Secret and Key
serverless config credentials --provider aws --key [YOUR_KEY] --secret [YOUR_SECRET]
Key Points for AWS Serverless API Configuration Using Serverless.yml File
As we dive into this process, I want to highlight a few high-level points to keep in mind as you walk through these steps for a successful API configuration:
1. Serverless is going to help us:
- Deploy our code to AWS Lambda functions
- Declare and provision our API endpoints in AWS API Gateway
- (Optional) deploy some code library that we may want to use
- Test locally as if it were running in AWS
- Create any IAM roles that we need
- Manage our environments, through we will reference environment variables so we can easily move between dev/prod/etc.
This is all setup using the serverless.yml config file.
2. Our Lambda architecture:
Our Lambda function will be called when someone calls our AWS serverless API endpoint. Do we want to handle our endpoint routing ourselves or have a separate function for each of our endpoints?
For this example we are going to let the API Gateway handle our calls, which means that we are going to set up a separate Lambda function for each endpoint.
Advantage:
- Each function can be maintained and redeployed independently.
- Each function ends up being a much smaller application that does just one thing.
- Common code can still be shared between functions using layers.
Architecture for API Configuration in AWS Lambda
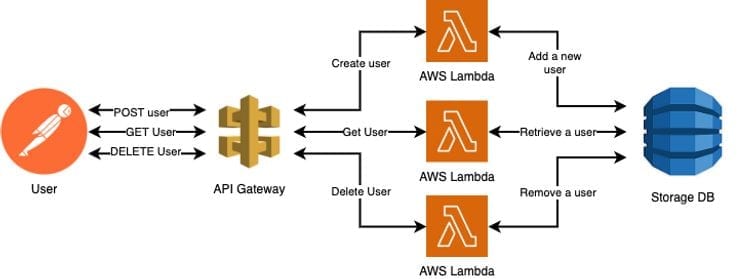
Create a Serverless.yml File:
- Create a new project using your favorite IDE and language:
- Create a “functions” folder and an empty “serverless.yml” file.
- Inside your “functions” folder create a new python file named “create_user.py”
- It should look something like this (ignore my venv folder for now):

Create User
Let’s begin implementing “create_user.py”:
We are going to need to add a handler(event, context) which will receive our event (request) body.
The event parameter will contain the payload and metadata that comes from the API call.
def handler(event, context):

    print(event)

    return {
        'body': "Creating User!"
    }
Now let’s take a look at our serverless.yml:
As mentioned above, this is our config file that we set everything up for us in AWS.
This includes: DynamoDB, our API endpoints, our Lambdas and all of the necessary permissions.
service: simple-aws-api-demo # This is your service name, change it for your application as needed

provider:
  name   : aws  # our environment will be in AWS but serverless can deploy in other places such as Azure and Google
  runtime: python3.7
  region : us-east-1 # our AWS region
  timeout: 5
  stage  : dev
  memorySize: 128
  environment:
    tableName: "demo-dynamo-table-${{self:provider.stage}}" # creates an env variable to reference our table name
  variableSyntax: "\\${{([ ~:a-zA-Z0-9._@\\'\",\\-\\/\\(\\)]+?)}}" # let's serverless know how we are referencing our variables

functions:
  create_user:
    handler: functions/create_user.handler # the handler is the entry point to your code
    timeout: 10
    memorySize: 512
    description: Receives user info and writes it to DynamoDB
    events:
      - http:   # this will create our API endpoint for us in the APIGateway
          path: /create_user  # our endpoint path
          method: post
Now let’s deploy our first function and test it.
In your terminal run “serverless deploy –stage dev”
Serverless will you the serverless.yml to configure and deploy your Lambda into AWS
You should get an output like this:

Now let’s try and call that API to see if it works
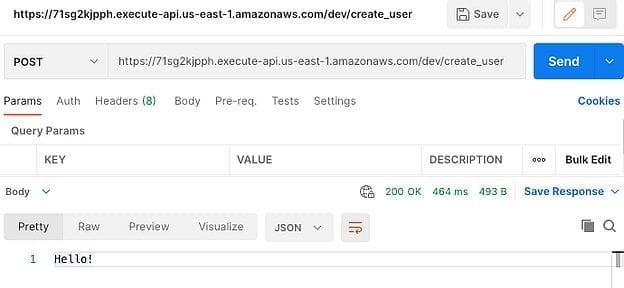
Using Postman we can see that our API is working and that the create_user Lambda is being called and returns our “Hello!” message.
As mentioned earlier the event parameter in our handler(event, context) will contain the information from the API call, including headers, users IP, path parameters, body and much more.
For our use case we are concerned with the “body” of the request because we are going to expect it to contain information about our user.
Let’s change our handler to look like this:
def handler(event, context):

    if event.get("body"):
        return {
            'body': event.get("body")
        }
    else:
        return {
            'body': "Missing body!"
        }
Now you can redeploy only this function by using the “serverless deploy –function create_user –stage dev” and it will be much faster since we are not touching any of our serverless API configuration, only swapping out the code in the function.
Now if you call your API again with a body like:
(make sure you “Content-Type” header is “application/json”)
{
“name”: “John Doe”,
“email”: ,“John.Doe@mail.com”,
“age”: 45,
“phone”: “555-555-5555″
}
You should get back exactly what you sent. And if you don’t send anything in the body you should see “Missing body!“
Serverless.yml Editing for AWS Serverless API Configuration
Now our next step is to save this information to our DynamoDB table! But first we are going to need to get serverless to put it all together for us in AWS. Time for some more serverless.yml editing!
Add this to your .yml:
resources: # everything below uses CloudFormation template syntax, which is the AWS syntax
  Resources:
    dynamoDBTable:                            # our resource name (can be what ever you want)
      Type: 'AWS::DynamoDB::Table'            # our resource type, follows AWS convention
      Properties:
        TableName: ${{self:provider.environment.tableName}}   # looks at our environment variable for the table name
        AttributeDefinitions:                                 # our column names and types
          - AttributeName: userEmail                          # dynamo doesn't require you to list all of your columns...
            AttributeType: S                                  # ...only those you will define as Primary Keys
        KeySchema:
          - AttributeName: userEmail                          # This will be our PK
            KeyType: HASH
        BillingMode: PAY_PER_REQUEST    # We are choosing to use this billing mode since it will be the cheapest for this demo
DynamoDB requires you to define only the attributes (column names) and types that you will use to partition your data with. Your KeySchema is what will identify a unique record, in our case that will be userEmail.
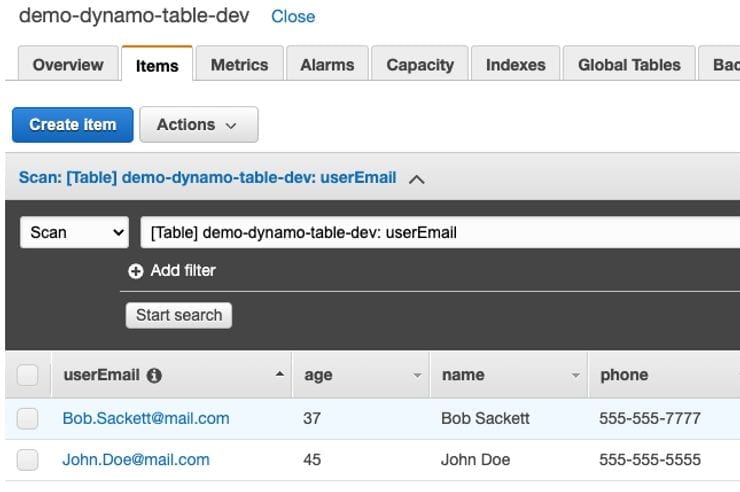
Now if you run “serverless deploy –stage dev” you should be able to see your new table in AWS:

Create User for AWS Serverless API Configuration
Now let’s implement the writing ability for our create_user Lambda function.
We’ll need to change our handler so that it picks up the json payload we’ll send via the API and use the data to create a user in DynamoDB.
from os import getenv
import boto3
import json

def handler(event, context):

    if event.get("body"):   # check if the API call has a body
        data = json.loads(event.get('body'))      # load the body as a json
        return {
            'body': json.dumps(add_user(data))   # return the results from our dynamo transaction
        }
    else:
        return {
            'body': "Missing body!"
        }
And we’ll create an add_event() method to handle the connection to Dynamo and write the new user to the DB.
def add_user(data):
    table_name = getenv('tableName')
    client_dynamo_db = boto3.client('dynamodb')
    try:
        return client_dynamo_db.put_item(
            TableName=table_name,
            Item={
                    "userEmail": {'S': data.get("email")},
                    "name": {'S': data.get("name")},
                    "age": {'S':  str(data.get("age"))},
                    "phone": {'S': data.get("phone")}
                }
            )
    except Exception as e:
        return {'error': str(e)}
Let’s go ahead and deploy it: “serverless deploy –stage dev”
Now let’s use Postman to call the API.
Oh no! You probably received this error:
{
 "error": "An error occurred (AccessDeniedException) when calling the PutItem operation: User: arn:aws:sts:::assumed-role/simple-aws-api-demo-dev-us-east-1-lambdaRole/simple-aws-api-demo-dev-create_user is not authorized to perform: dynamodb:PutItem on resource: arn:aws:dynamodb:us-east-1::table/demo-dynamo-table-dev"
}
That is because our Lambda function does not have permission to Put an Item into dynamo. To grant it permission we’ll first need to install a Serverless plugin that will allow us set permissions using the .yml.
Go ahead and run this in the console of your IDE: “serverless plugin install –name serverless-webpack” and then let’s add a reference to the plugin in our .yml.
plugins:
  - serverless-iam-roles-per-function
Now in the functions of our yml let’s grant our create_user function the permission to write to DynamoDB:
functions:
  create_user:
    handler: functions/create_user.handler # the handler is the entry point to your code
    timeout: 10
    memorySize: 512
    description: Receives user info and writes it to DynamoDB
    iamRoleStatementsName: simple-aws-api-demo-dynamodb-write-role
    iamRoleStatements:
      - Effect: "Allow"
        Action:
          - dynamodb:PutItem  # allow this function to write to Dynamo
        Resource: "arn:aws:dynamodb:${{self:provider.region}}:*:table/${{self:provider.environment.tableName}}"
    events:
      - http:   # this will create our API endpoint for us in the APIGateway
          path: /create_user  # our endpoint path
          method: post
Now if you deploy again you should be able to Post a new user and see in your DynamoDB table.
Pro Tip 1 for API Configuration: If you have already deployed a function, and if you have not made any changes to your .yml, it can be MUCH faster to redeploy ONLY the function you are working on by specifying the function name in the deploy command. ex: “serverless deploy –function create_user –stage dev“
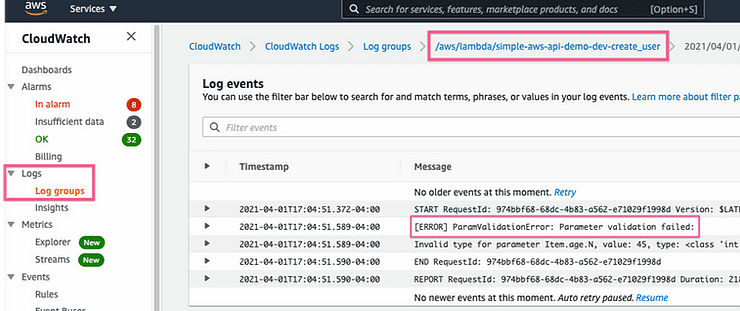
Pro Tip 2 for API Configuration: If you ever get “Server Error” when you call your API, you can check the CloudWatch logs for you function to find what the error was:
Now that we can add items to our DB, let’s implement reading and removing them.
First let’s configure our Serverless.yml for our two new functions. Let’s also add the required read and delete permissions since we know about that:
get_user:
  handler: functions/get_user.handler # the handler is the entry point to your code
  timeout: 10
  memorySize: 512
  description: Retreives user info from DynamoDB
  iamRoleStatementsName: simple-aws-api-demo-dynamodb-read-role
  iamRoleStatements:
    - Effect: "Allow"
      Action:
        - dynamodb:GetItem  # allow this function to read from Dynamo
      Resource: "arn:aws:dynamodb:${{self:provider.region}}:*:table/${{self:provider.environment.tableName}}"
  events:
    - http:
        path: /get_user/{email}
        method: get

delete_user:
  handler: functions/delete_user.handler # the handler is the entry point to your code
  timeout: 10
  memorySize: 512
  description: Delete user info from DynamoDB
  iamRoleStatementsName: simple-aws-api-demo-dynamodb-delete-role
  iamRoleStatements:
    - Effect: "Allow"
      Action:
        - dynamodb:DeleteItem  # allow this function to delete from Dynamo
      Resource: "arn:aws:dynamodb:${{self:provider.region}}:*:table/${{self:provider.environment.tableName}}"
  events:
    - http:
        path: /delete_user/{email}
        method: delete
As you can see from the serverless.yml above, we are expecting them to pass the user email (which is our primary key) as a path parameter: path: /get_user/{email}.
Get Users
Now create the get user function in your functions folder: get_user.py
In our handler, we are going to check the path parameters to make sure the email is there.
We’re also going to add some error handling in case the user they requested doesn’t exist.
get_user.py
from os import getenv
import boto3
import json
from botocore.exceptions import ClientError


def handler(event, context):

    if event.get('pathParameters') and event['pathParameters'].get('email'):
        email = event['pathParameters'].get('email')     # get the user email from the path
        return {
            'body': json.dumps(get_user(email))   # return the results from our dynamo transaction
        }
    else:
        return {
            'body': "User email is a required PATH parameter ex: get_user/foo@bar.com"
        }


def get_user(email):
    dynamodb = boto3.resource('dynamodb')
    table = dynamodb.Table(getenv('tableName'))
    try:
        response = table.get_item(Key={'userEmail': email})

        if response.get('Item') is None:
            return {'error': "No item found matching that key"}
        else:
            return response.get('Item')

    except ClientError as e:
        return {'error': str(e.response['Error']['Message'])}
Delete User
For deleting a user, something to not about DynamoDB is that it’s DeleteItem is idempotent meaning that it does not require the item to exist, it will always send back a successful message.
However we can add a parameter called ReturnValues=’ALL_OLD’ to request that it returns the item that was deleted. That way we can check to see that if nothing was returned it is because the item did not exist.
You can deploy everything.
delete_user.py
from os import getenv
import boto3
import json
from botocore.exceptions import ClientError


def handler(event, context):

    if event.get('pathParameters') and event['pathParameters'].get('email'):
        email = event['pathParameters'].get('email')     # get the user email from the path
        return {
            'body': json.dumps(delete_user(email))   # return the results from our dynamo transaction
        }
    else:
        return {
            'body': "User email is a required PATH parameter ex: delete_user/foo@bar.com"
        }


def delete_user(email):
    dynamodb = boto3.resource('dynamodb')
    table = dynamodb.Table(getenv('tableName'))
    try:
        response = table.delete_item(Key={'userEmail': email}, ReturnValues='ALL_OLD')
    except ClientError as e:
        return {'error': str(e)}
    else:
        if response.get('Attributes') is None:
            return {'error': "No item found"}
        else:
            return response
You can now deploy and test your two new API endpoints: get_user (GET method) and delete_user (DELETE method).
Great! But there is one final thing that we need to address, in fact we should have begun with this: security. Anyone can now create, read and delete your users if they know the API endpoint!
Security for AWS Serverless API Configuration
There are a number of ways that we can address, and AWS makes it very easy. However, for this example we are simply going to require an API key.
To lock our endpoints let’s add one more config to our http config: private: true
The event config for all three functions should have that requirement:
events:
  - http:
      path: /get_user/{email}
      method: get
      private: true
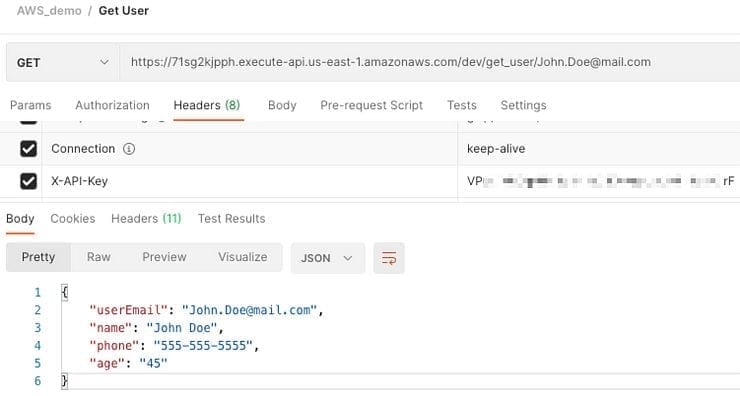
Now if you deploy and try to hit the API from Postman you will receive a “Forbidden” message unless you also pass a “X-API-Key” in your request Header.
But where’s the key??
Once again we’ll have serverless configure that for us by adding
nn
Add apiKeys to your “provider” config with the key name:
provider:
  name   : aws
  apiKeys:
    - simple-aws-api-demo-${{self:provider.stage}}
  runtime: python3.7
  region : us-east-1
  ...
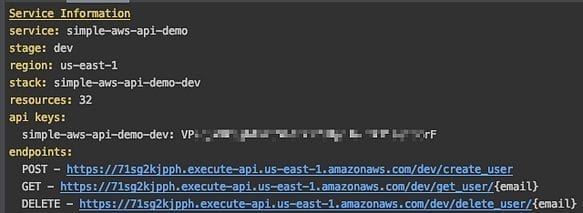
Next time you deploy serverless will tell you what you API key is:
Now in Postman, you will need to add the key to your headers:
You are now back in business, and decently safe from unwanted access!
I hope this was clear enough and helped with your AWS Serverless API configuration. You can find the project code here: https://github.com/sChalvet/simple_aws_api_demo
Read Other Graphable AppDev Articles:
- What is an AWS Serverless Function?
- Application-driven Graph Schema Design
- The Power of Graph-centered AppDdev – Graph Database Applications
- Graph AppDev with GraphQL Relay
- Neo4j GraphQL Serverless Apps with SST
- Streamlit tutorial for building graph apps
- How to build a Domo app using React


